Friday, June 27, 2014

How to show the error messages in the same comment form in Wordpress.


 How to show the error messages in the same comment form in Wordpress .
Today i am discussing about how to show the error messages in the same wordpress comment form. Every one knows that as default wordpress comment form shows the error in a new page, from a user perspective it is very difficult to go to the next page, and then showing the error message and manually he comes back to the old page. So for avoiding that we found a solution for this behavior. That is pretty simple. We can achieve this by using some Jquery and some php codes.

Here I am showing how to show the duplicate error message in the same comment page and comment form validation.

Take your comments.php file, it is located in wordpress/wp-includes/comment.php

take a function called wp_allow_comment

Find this line die( __('Duplicate comment detected; it looks as though you’ve already said that!') );

replace this line with below codes

$url = add_query_arg( 'comment_error', 10, get_comment_link());
wp_redirect( $url );
exit;

Find this line
wp_die( __('Duplicate comment detected; it looks as though you’ve already said that!') );

replace this line with below codes
$url = add_query_arg( 'com_err', 10,get_comment_link());
wp_redirect( $url );
exit;

So it wont let you go to the error page.
After loading the comment form then we put below code. Then the error message will appear in the same page.

<script type="text/javascript">
jQuery("#submit").click(function () {
var emailRegex = /^[\w-\.]+@([\w-]+\.)+[\w-]{2,4}$/;
var urlPattern = /(http|ftp|https):\/\/[\w-]+(\.[\w-]+)+([\w.,@?^=%&amp;:\/~+#-]*[\w@?^=%&amp;\/~+#-])?/;
jQuery("#errordisp").remove();
if(jQuery("#author").length)
{
if(jQuery("#author").val().trim()=='' ){
showMessage('author','Please enter your name.');
jQuery("#author").focus();
return false;
}
if(jQuery("#email").val().trim()=='' ){
showMessage('email','Please enter your email address.');
jQuery("#email").focus();
return false;
}
if(!jQuery("#email").val().match(emailRegex)){
showMessage('email','Please enter a valid email address.');
jQuery("#email").focus();
return false;
}
if(jQuery("#url").val().trim()!='' ){
if(!jQuery("#url").val().match(urlPattern))
{
showMessage('url','Please enter a valid web Url.');
jQuery("#url").focus();
return false;
}
}
}
if(jQuery("#comment").val().trim()=='' ){
showMessage('comment','Please enter comment.');
jQuery("#comment").focus();
return false;
}
return true;
});
function showMessage(target,mes)
{
jQuery( 'html, body' ).animate({scrollTop:jQuery('#respond').position().top}, 'slow');
jQuery('<div id="errordisp">'+ mes + '</div>').insertAfter('#'+target);
setTimeout(function() { jQuery('#errordisp').remove(); }, 5000);
}
jQuery("#cancel-comment-reply-link").click(function(){
jQuery("#comment").val('');
jQuery("#errordisp").hide();
});
</script>

Wednesday, October 30, 2013

Custom Login module creation in Magento 2


Some modifications in my earlier post adding to that i have changed my view.phtml file,

My previous blog
There is a slight modification in the view.phtml file


If you are not able to see the image please check the below codes.

<?php if (!Mage::getSingleton('customer/session')->isLoggedIn()){
$login_url  = $this->getUrl('*/*/login', array('_secure'=>(!empty($_SERVER['HTTPS']) && $_SERVER['HTTPS']==='on')));
$http_mode  = (!empty($_SERVER['HTTPS']) && $_SERVER['HTTPS']==='on');
if($http_mode)
    $login_url  = str_replace('http:', 'https:', $login_url);  
?>
    <form method="post" id="login-form" action="<?php echo $login_url ?>">
    <ul class="form-list">
            <li>
                <label class="required" for="login:email"><em>*</em><?php echo $this->__('Email') ?></label>
                <div class="input-box">
                    <input type="text" name="login[username]" value="<?php echo $this->htmlEscape($this->getUsername()) ?>" placeholder="Email" id="email" class="input-text required-entry validate-email" title="<?php echo $this->__('Email Address') ?>" />
                </div>
            </li>
            <li>
                <label class="required" for="login:password"><em>*</em><?php echo $this->__('Password') ?></label>
                <div class="input-box">
                    <input type="password" name="login[password]" class="input-text required-entry validate-password" placeholder="Password" id="pass" title="<?php echo $this->__('Password') ?>" />
                </div>
             </li>

<button type="submit" class="button" title="<?php echo $this->__('Login') ?>" name="send" id="send2"><span><span><?php echo $this->__('Login') ?></span></span></button> </ul></form>
<?php }?>
 <script type="text/javascript">
    //<![CDATA[
        var loginForm = new VarienForm('login-form', true);
    //]]>
    </script>

Tuesday, August 20, 2013

Custom Login module creation in Magento


Custom Login module creation in Magento
Magento is an open source ecommerce solution. Magento module development have a certain standard procedures. Let us look in to the new custom module creation.

Create one folder local inside app/code/. This local folder is used for our custom module creation. This folder will not affect any upgrade of magento in future if any.
/app/code |- /core/ |- /community/ |- /local/
Inside this local folder create another folder called as Name Space, inside that folder create another folder, it is usually called as modulename.
App/code/local/Test/Mymodule.

app/code/local/Test/Mymodule/
here Test is our Name Space and Mymodule is our modulename

How to activating the module

Create a file Test_Mymodule.xml in app/etc/modules/, this will tell Magento to look for and use our custom module. 

create config.xml file in app/code/local/Test/Mymodule/etc

Then create a controller file called as IndexController.php in app/code/local/Test/Mymodule/controllers
 
inside that file write our indexaction
 

Create login Action function


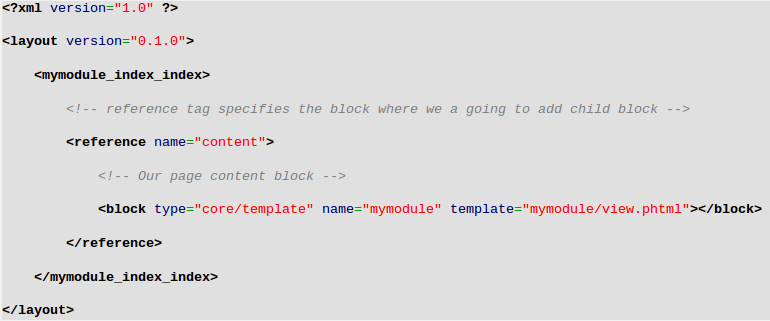
Now let's create mymodule.xml file in app/design/frontend/default/default/layout/
 
Create a template file callled as view.phtml in app/design/frontend/default/default/template/mymodule
this is our login form
 
create a Block file called as Mymodule.php in app/code/local/Test/Mymodule/Block/ the block folder might not be there, we have to create the same.
 
type this url in your browser and check the custom login module http://localhost/Projectname/mymodule

some modification in the view.phtml Check this 

Tuesday, March 26, 2013

Shell Script in Linux

Shell Script in Linux and some examples
 Computers understand only binary languages (0's and 1's),  which are very difficult for humans to understand.  So, for Linux OS (Operating System) there is a special program called Shell. This program accepts instructions or commands from users in English, and converts it to binary languages. We can say it is acts as a mediator for kernel - the heart of Linux. Shell uses the system kernel to execute programs and create files etc.

Shell script is defined as the series of commands written in a text file. Shell scripts have more power than the MS-DOS.

Here is some shell script examples in Linux. First create a file with an extension of .sh, for that take a terminal and type command gedit myshell.sh here i have used gedit you can use any editors, and change the file permissions to executable format, for that we are using chmod 755 filename. For executing this file in terminal "./filename or bash filename".

Palindrome:
Output:


Chess board:

Output:


Lets have fun with shell script!

Step wave form:
Output:

Friday, March 8, 2013

Basic Linux Commands


Basic Linux commands

Most of the Linux users should knows the use of basic Linux commands or Linux commands, they are using different commands daily, but windows people they are scared about theses much of commands, if any one saying about Linux their mind will first goes to how we remember all these commands? If you used to see theses commands it will be very easy. For our daily needs these commands are very useful to us. Linux is basically a command oriented operating system, from the starting of Linux it is fully controlled by commands, Now we can see the developed versions of various distributions in Linux, mainly the graphical user interfaces (GUI), for easy usage and graphical visualization.

Here i am introducing some basic commands, for beginners.

pwd : present working directory.

This command will list where we are now?

ls : This command is listing all files and folders.

cd : This command is used for changing the directory,
Ex : cd Directory name

cd - : Switch to previous directory

mkdir : Make directory
Ex : mkdir Directory name

rm -r : Remove directory
Ex: rm -r Directory name

rm -rf : Remove directory Forcefully

chmod : Change the permission of files and folders
Ex: chmod 777 -R dirname 

Thursday, July 26, 2012

Adding a new user in sudoers list with root user privilege (ubuntu)

For adding a new user in the 'sudoers' list follow the procedures given below:
(in order to do this you should have root user privilege)

--> Take terminal window (from Applications->Accessories->Terminal or press Ctrl+Alt+T)

--> Type the command: sudo visudo

the terminal will display something like this:

------------------------------------------------------------------------------------------------------------------------------
GNU nano 2.2.2            File: /etc/sudoers.tmp
 
# /etc/sudoers
#
# This file MUST be edited with the 'visudo' command as root.
#
# See the man page for details on how to write a sudoers file.
#
Defaults        env_reset
# Host alias specification
# User alias specification
# Cmnd alias specification
# User privilege specification
root    ALL=(ALL) ALL
# Allow members of group sudo to execute any command after they have
# provided their password
# (Note that later entries override this, so you might need to move
# it further down)
%sudo ALL=(ALL) ALL
#
#includedir /etc/sudoers.d
# Members of the admin group may gain root privileges
%admin ALL=(ALL) ALL
-----------------------------------------------------------------------------------------------------------------------------

--> Now, after the 'root ALL=(ALL) ALL' statement, add your username in the following syntax:

domainname\\username = ALL=(ALL) ALL

eg: CODETECH\\tiger ALL=(ALL) ALL

Note: at the time of login you have to give CODETECH\\username as username